Thursday, December 30, 2021

Beatty's Chocolate Cake

I tried Ina Garten's famous chocolate recipe from the cookbook - Barefoot Contessa at Home. It is rich and moist, an instant favorite of the family.  

Ingredients

Cake
All-purpose flour - 1 3/4 cups
Sugar - 2 cups 
Good cocoa powder - 3/4 cups 
Baking soda - 2 tsp
Baking powder - 1 tsp
Kosher salt - 1 tsp
Buttermilk - 1 cup, shaken
Vegetable oil - 1/2 cup 
Extra-large eggs - 2 , at room temperature (Used egg replacer)
Pure vanilla extract - 1 tsp
Freshly brewed hot coffee - 1 cup
Chocolate Buttercream Frosting
Good semisweet chocolate - 6 ounces 
Unsalted butter - 1/2 pound, at room temperature
Extra-large egg yolk - 1 , at room temperature
Pure vanilla extract - 1 tsp
Confectioners' sugar - 1 1/4 cups, sifted
Instant coffee powder - 1 TBSP

Steps

1. Preheat the oven to 350º F. Butter two 8-inch x 2-inch round cake pans. Line with parchment paper, then butter and flour the pans. I used 3 6" round cake pans.
2. Sift the flour, sugar, cocoa, baking soda, baking powder, and salt into the bowl of an electric mixer fitted with a paddle attachment and mix on low speed until combined. In another bowl, combine the buttermilk, oil, eggs, and vanilla. With the mixer on low speed, slowly add the wet ingredients to the dry. With mixer still on low, add the coffee and stir just to combine, scraping the bottom of the bowl with a rubber spatula. 
3. Pour the batter into the prepared pans and bake for 35 to 40 minutes, until a cake tester comes out clean. Cool in the pans for 30 minutes, then turn them out onto a cooling rack and cool completely.
4. Chop the chocolate and place it in a heat-proof bowl set over a pan of simmering water. Stir until just melted and set aside until cooled to room temperature.
5. In the bowl of an electric mixer fitted with a paddle attachment, beat the butter on medium-high speed until light yellow and fluffy, about 3 minutes. Add the egg yolk and vanilla and continue beating for 3 minutes. 
6. Turn the mixer to low, gradually add the confectioners' sugar, then beat at medium speed, scraping down the bowl as necessary, until smooth and creamy. 
7. Dissolve the coffee powder in 2 teaspoons of the hottest tap water. On low speed, add the chocolate and coffee to the butter mixture and mix until blended. Don't whip! 
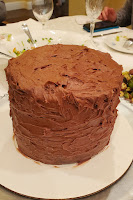
8. Place 1 layer of cake, flat side up, on a flat plate or cake pedestal. With a knife or offset spatula, spread the top with frosting. Place the second layer on top, rounded side up, and spread the frosting evenly on the top and sides of the cake.

Tuesday, December 28, 2021

Cranberry Orange Shortbread Cookie

The orange flavor is a great addition to the traditional cranberry shortbread in this recipe. It is perfect with a cup of coffee or tea.

Ingredients

Unsalted butter - 1 cup, softened to room temperature
Confectioners' sugar - ½ cup 
Vanilla extract - 1 tsp
Orange zest - 1 TBSP
Salt - ¼ tsp
All-purpose flour - 2 cups
Dried cranberries - ½ cup, chopped

Steps

1. Cream the butter and sugar together using a stand mixer until light and fluffy, about 2 minutes.
2. Add vanilla, orange zest, and salt and beat until incorporated. Add flour and cranberries and beat until mixture forms into a dough.
3. Use your hands to shape the dough into a ball. Then, roll the dough into a log, 2-inches in diameter or to your preference. 
4. Wrap the log tightly with plastic cling wrap and refrigerate for 2 hours, up to overnight.
5. Preheat oven to 350º F. Line a half sheet baking pan with a silicone baking mat or parchment paper.
6. Cut the dough into ¼-inch to ½-inch slices, and place on the baking sheet about ½-inch apart. Bake for 10-12 minutes until just starting to brown on the edges.
7. Allow cookies to cool in the pan for 5 minutes before transferring to a wire cooling rack to cool completely.

Green Onion Pancake(葱油饼)

Green onion pancake is a Chinese staple dish. Every family does it a little differently. This method uses oil roux to make the pancake more crispy. 

Ingredients

Yields 4 large pancakes.
Dough
All-purpose flour - 2¼ cups 
Salt - ¼ tsp
Water - 1 cup, warm
Oil - 1 tsp
Roux
Vegetable oil - 3 TBSP 
All-purpose flour - 1/3 cup 
Salt - ¼ tsp
Additional Filling
2 bunches scallions (finely chopped, about 2 cups)

Steps

1. In a medium mixing bowl, mix flour, salt, and warm water with a wooden spoon or rubber spatula until a sticky dough forms. The dough should be sticky, but not wet. You can add up to 2 tablespoons more flour if you feel the dough is really wet.
2. Use a teaspoon of oil to coat the top of the dough round. Don’t worry about the dough sticking to the bowl for now. Cover with plastic wrap and let rest for 1 to 2 hours.
3. Combine all ingredients for the roux together in a bowl. Set aside.
4. After the dough has rested, use a teaspoon or two of oil to coat your work surface. Take the dough out and use a little more oil if you feel the dough is sticking to your hands or work surface. Is should be soft and pliable, and the oil keeps everything from sticking together.
5. Divide the dough into 4 equal pieces and roll each piece out lengthwise into a long strip. Next, take about ¼ of the roux, and spread it across the entire length of the dough with your hands. Take ½ cup of the chopped scallions, and spread them generously and evenly across the length of the dough.
6. Roll the dough, folding and tucking in the edges every so often so you don’t have any scallions leaking out of the sides. You end up with a little bundle of joy that you should set aside and cover with a piece of plastic wrap to avoid drying out. 
7. Repeat for the other three pancakes. At this point, you can also let the dough rest for 30 minutes to make rolling easier.
8. Place the dough ball with the spiral pattern facing up on your work surface. Flatten it with your hands or a rolling pin, so the dough round is about ¼-½-inch thick. 
8. Heat a cast iron pan over medium heat, and add 4 tablespoons of oil. Place the pancake in the pan. The pan should be hot enough so the dough is sizzling, but browning slowly. Move the dough around the oil to cook the sides of the pancake. When the bottom is slightly browned (about 2 minutes), turn the pancake over gently, being careful not to splash the oil. Turn it over if you think more browning is needed.
9. Transfer the scallion pancake to a preheated oven at 350F, and let bake for another 5 minutes for more crisping. 
10. Take the pancakes out of the oven and cut into wedges to serve. If you like, now’s the time to sprinkle some extra salt on top to taste.

Monday, December 27, 2021

Sugared Cranberry

This is a great snack to make using leftover cranberries from Thanksgiving. It is also pretty to use for cake decoration. 

Ingredients

Water - 1/2 cup water
Sugar - 1 and 1/2 cups, divided
Fresh cranberries - 3 cups, rinsed and dried

Steps

1. In a medium saucepan, combine 1/2 cup water and 1/2 cup sugar. Bring to a boil and let it simmer on low heat for 3 minutes. 
2. Stir in the cranberries to fully coat in the syrup then remove from heat and stir 1 minute.
3. Remove cranberries with a slotted spoon and transfer to a parchment lined baking sheet or a metal rack to let cranberries dry out for 1 hour.
4. Roll cranberries in batches in the remaining 1 cup sugar to coat.

Friday, November 26, 2021

Blueberry Scone

I tried scones for the first time following this recipe. I skipped the topping, used fresh blueberry. They were buttery fluffy delight with juicy burst of blueberry. 

Ingredients

All-purpose flour - 2 cups, plus more for hands and work surface
Granulated sugar - 1/2 cup
Baking powder - 2 and 1/2 tsp
Ground cinnamon - 1 tsp
Salt - 1/2 tsp
Unsalted butter - 1/2 cup, frozen
Heavy cream - 1/2 cup, plus 2 TBSP for brushing
Egg - 1 large (used egg replacer)
Pure vanilla extract - 1 and 1/2 tsp
Fresh or frozen blueberries (do not thaw) - 1 heaping cup
Optional topping: coarse sugar and vanilla icing

Steps

1. Whisk flour, sugar, baking powder, cinnamon, and salt together in a large bowl. 
2. Grate the frozen butter using a box grater. Add it to the flour mixture and combine with a pastry cutter, two forks, or your fingers until the mixture comes together in pea-sized crumbs. Place in the refrigerator or freezer as you mix the wet ingredients together.
3. Whisk heavy cream, egg, and vanilla extract together in a small bowl. Drizzle over the flour mixture, add the blueberries, then mix together until everything appears moistened.
4. Pour onto the counter and, with floured hands, work dough into a ball as best you can. Dough will be sticky. If it’s too sticky, add a little more flour. If it seems too dry, add 1-2 more Tablespoons heavy cream. Press into an 8-inch disc and, with a sharp knife or bench scraper, cut into 8 wedges.
5. Brush scones with remaining heavy cream and for extra crunch, sprinkle with coarse sugar. (You can do this before or after refrigerating in the next step.)
6. Place scones on a plate or lined baking sheet and refrigerate for at least 15 minutes. (I left it in the fridge overnight so that I can bake it fresh in the morning)
7. Preheat oven to 400°F.
8. Line a large baking sheet with parchment paper or silicone baking mat. After refrigerating, arrange scones 2-3 inches apart on the prepared baking sheet(s).
9. Bake for 22-25 minutes or until golden brown around the edges and lightly browned on top. Remove from the oven and cool for a few minutes before topping with vanilla icing.
Leftover iced or un-iced scones keep well at room temperature for 2 days or in the refrigerator for 5 days.

Notes
  • Freeze Before Baking: Freeze scone dough wedges on a plate or baking sheet for 1 hour. Once relatively frozen, you can layer them in a freezer-friendly bag or container. Bake from frozen, adding a few minutes to the bake time. Or thaw overnight, then bake as directed.
  • Freeze After Baking: Freeze the baked and cooled scones before topping with icing. I usually freeze in a freezer-friendly bag or container. To thaw, leave out on the counter for a few hours or overnight in the refrigerator. Warm in the microwave for 30 seconds or on a baking sheet in a 300°F (149°C) oven for 10 minutes.
  • Overnight Instructions: Prepare scones through step 4. Cover and refrigerate overnight. Continue with the recipe the following day.
  • Over-spreading: Start with very cold scone dough. Expect some spread, but if the scones are over-spreading as they bake, remove from the oven and press back into its triangle shape (or whatever shape) using a rubber spatula.

Thursday, November 25, 2021

Easy Cinnamon Rolls

Followed this easy cinnamon roll recipe to make this for breakfast. I made the dough to step 5 and covered with plastic wrap  to let rest in the refrigerator overnight. The next morning, removed from the refrigerator and allow to rise in a warm environment, about 1 hour. Then continue to step 7.

Ingredients

Rolls
All-purpose flour - 2 and 3/4 cups
Granulated sugar - 1/4 cup
Salt - 1/2 tsp
Active dry yeast - 2 and 1/4 tsp
Whole milk - 1/2 cup
Water - 1/4 cup
Unsalted butter - 3 TBSP
Egg - 1 large (used egg replacer)
Filling
Unsalted butter - 3 TBSP, at room temperature
Ground cinnamon - 1 TBSP
Granulated sugar or packed light or dark brown sugar - 1/4 cup
Icing
Confectioners’ sugar - 1 cup
Pure vanilla extract - 1/2 tsp
Strong brewed coffee or milk - 2–3 TBSP

Steps

1. Whisk the flour, sugar, salt, and yeast together in a large bowl. Set aside.
2. Combine the milk, water, and butter together in a heatproof bowl. Microwave until the butter is melted and the mixture is warm to touch (about 110°F). Pour into the dry ingredients, add the egg, and stir until it forms a soft dough or use your mixer.
3. On a lightly floured surface using floured hands, knead the dough for 3 minutes. Place in a lightly greased bowl, cover loosely, and let rest for about 10 minutes.
4. Roll the dough out in a 14×8 inch rectangle. Spread the softened butter on top. Mix together the cinnamon and sugar. Sprinkle it all over the dough.
5. Roll up the dough tightly to make a 14 inch log. Cut into 10-12 even rolls and arrange in a lightly greased 9-inch round cake pan or pie dish.
6. Tightly cover the rolls with aluminum foil or plastic wrap and allow to rise in a warm, draft-free environment for 60-90 minutes.
7. After the rolls have doubled in size, preheat the oven to 375°F. Bake for 25-28 minutes until lightly browned. If you notice the tops are getting too brown too quickly, loosely cover the rolls with aluminum foil and continue baking.
8. Whisk the confectioners’ sugar, vanilla extract, and coffee/milk together. Drizzle or spread over warm rolls.
Cover leftover frosted or unfrosted rolls tightly and store for up to 3 days at room temperature or up to 5 days in the refrigerator.

Thursday, November 18, 2021

Egg-Free Chocolate Chip Cookie

This Ultimate Egg-Free Chocolate Chip Cookie recipe uses cream cheese to replace eggs. I baked large size cookies and they ended up lightly crispy around the edges and moist in the middle.

Ingredients

All-purpose flour - 2 1/4 cups 
Baking soda - 1 tsp
Salt - 1/2 tsp 
Butter - 1 cup, at room temperature
Sugar - 3/4 cup
Brown sugar - 3/4 cup, packed
Cream cheese - 1 pack (8 oz.), at room temperature
Vanilla extract - 2 tsp
Semi-sweet chocolate chips - 2 cups
Yield 18 large cookies (ice cream scoop size)

Steps

1. Sift together flour, baking soda and salt; set aside. 
2. In large mixer bowl, cream together butter, sugar, brown sugar, cream cheese, and vanilla extract. Gradually blend dry mixture into butter/sugar mixture. Stir in chocolate chips. 
3. Use cookie scoop or ice cream scoop (about 4TBSP size) to shape into round dough. Put in freezer to chill for at least one hour. 
4. When ready to bake, preheat oven to 350ºF. Line baking sheets with parchment paper. Place 6 balls per sheet and bake for 20 min, or until golden brown around the edges. (it will be shorter if your ball of cookie dough is smaller)
5. Allow to cool for 15 to 20 minutes before serving. You can store them in the fridge for up to 2 weeks in a airtight container and in the freezer for 1 to 2 months. I prefer to store the unbaked balls of cookie doughs in freezer. Nothing beat the smell of freshly baked cookies. 

Soccer Ball Cookies

I made these cookies for soccer team. The dough is the same recipe from the egg free sugar cookies. I made two batches of dough, one white, and one brown. To make the brown dough, replace 1/4 all purpose flour in the recipe with 1/4 cup of unsweetened cocoa powder.

I used hexagon shape cookie cutter to cut out small white and brown hexagons, then arranged them into soccer ball patterns, finally use a round cutter to cut out the ball shape. 

Wednesday, November 10, 2021

Lemon Raspberry Bundt Cake

We tried this recipe using egg replacer instead egg. It became my daughter's instant favorite. 

Ingredients

For the Bundt Cake
Cake flour - 2 and 1/2 cups (10 and 1/4 ounces)
Baking powder - 1 tsp
Baking soda - 1/2 tsp
Salt - 1/2 tsp 
Unsalted butter - 8 oz. at room temperature 
Cream cheese - 8 oz. at room temperature 
Granulated sugar - 2 cups
Finely grated lemon zest - 1 TBSP 
Eggs - 5 large, at room temperature (used equivalent egg replacer)
Fresh raspberries - 2 cups (or 8 oz)
All-purpose flour - 3 TBSP
For the Cream Cheese Frosting
Cream cheese -  4 ounces, room temperature 
Unsalted butter - 2 ounces, room temperature 
Confectioners' sugar - 2 and 1/2 cups , sifted, more if needed 
Salt - 1/8 tsp
lemon extract - 1/2 teaspoon (replaced with 1/2 tsp lemon zest)
Lemon juice - 1 TBSP
For Decoration
Fresh raspberries 
Lemon slices 
Lemon zest 

Steps

For the Bundt Cake
1. Preheat oven to 325°F (163°C). Generously grease a 10-inch (12-cup) bundt pan, being sure to coat all of the nooks and crannies. 
2. In a medium mixing bowl, whisk together the cake flour, baking powder, baking soda, and salt; whisk well to combine then set aside until needed. 
3. In the bowl of a stand mixer fitted with the paddle attachment, beat the butter and cream cheese at medium speed until smooth and creamy, about 1 minute. 
4. Gradually add in the sugar, then increase the speed to medium-high and continue beating until light and fluffy, about 3 minutes. 
5. Beat in the lemon zest. Reduce the speed back to medium, then add in the eggs, one at a time, beating well after each addition and scraping down the sides of the bowl as needed. 
6. Reduce the speed to low and add in the flour mixture, mixing just until combined.
7. In a medium mixing bowl, combine the Raspberries and flour and toss well to coat. Using a rubber spatula, gently fold the raspberries into the batter until just combined. Scrape the batter into the prepared pan. 
8. Bake for 65 to 75 minutes, or until the cake is golden and a toothpick inserted into the center of the cake comes out clean. 

9. Allow the cake to cool in the pan, set on a wire rack, for 20 minutes. Then invert the cake onto the rack and cool completely. 

For the Cream Cheese Frosting
10. In the bowl of a stand mixer fitted with the paddle attachment, beat the cream cheese and butter on medium-speed until completely smooth. Reduce the speed to low and gradually add in the confectioners' sugar, beating until all of the sugar is completely combined. 
11. Add in the salt, lemon extract, and lemon juice and beat smooth. Once all of the ingredients have been incorporated, increase the speed to medium-high and beat for a minute. 
For Decoration
12. Spread frosting on the top and sides of the cooled cake. Top with fresh raspberries, lemon slices, and lemon zest. Slice and serve, or store in an airtight container in the fridge, for up to 5 days.

Tuesday, October 26, 2021

Kabocha Croquettes

Crisp outside, sweet and savoy inside. Those croquettes are perfect fall season appetizers. Kabocha is an Asian variety of winter squash. It is also commonly called Japanese pumpkin. I adapted from a recipe from Just One Cookbook. I used a whole Kabocha and made about 3 dozen croquettes. 

Ingredients

Kabocha - 1 medium size, about 2-3 lb
Bacon - 6 slices or to taste (I used a whole pack :-)
Onion - 1, minced
Unsalted butter - 1 TBSP
Salt - 1 tsp, or to taste
Freshly ground black pepper - 1/2 tsp, or to taste
[For Breading]
All-purpose flour - 1 cup
Buttermilk - 1 cup (made with 1 cup milk + 2 TBSP lemon juice)
Panko - 2 cups or more
[For Deep-frying]
Vegetable oil - 3 cups or more, depends on pot size

Steps

1. Remove seeds and pith from the kabocha and cut into big chunks. Steam kabocha for 20 minutes or until tender (enough that you can mash with fork). Remove the kabocha from the pot and transfer to a bowl. Let it cool until you can touch (but still warm). Remove the skin and mash with a fork.
2. While steaming the kabocha, mince the onion, cut the bacon into small bits. Heat the butter in a large frying pan over medium heat. Add the onion and sauté for 2-3 minutes, and add the bacon. Cook until the onion is translucent, tender, and nicely brown. Set aside.
3. Add the onion and bacon mixture to the mashed kabocha. Do not add the excess oil, which could make the mixture too wet. Season with salt and pepper to taste. Combine well together. 
4. Using a cookie scoop (I used a tablespoon), scope batter into ball shape (No worry if it is not perfect round). Cover with plastic wrap and refrigerate for 15 minutes so the balls become firmer. 
5. After 15 minutes, the balls are much easier to handle. Coat kabocha balls in flour and roll them to be more rounded. Put them back to fridge for another 15 minutes. During this time, the flour absorbs moisture. As a result, it will be less splatter in oil and the batter becomes sticker and won’t come off while deep frying.
6. For each ball, coat with buttermilk, and then panko. Cover with plastic wrap and rest in the refrigerator for another 15 minutes. 
7. Heat oil to 340ºF (170ºC) in a pot. Insert the long chopsticks, and when you see small bubbles appear around them, it’s ready to deep fry the croquette. The filling of the croquette is cooked already, so all you need is to fry the coating until golden brown. 
8. Transfer golden kabocha croquette to a wire rack or a plate lined with paper towel. Optionally, sprinkle some salt such as sea salt or Himalayan pink salt. 

Once it’s cooled completely, you can put the leftovers in an airtight container and store in the refrigerator for 3 days and in the freezer for up to a month. To serve again, reheat with air fryer for 3-5 minutes.